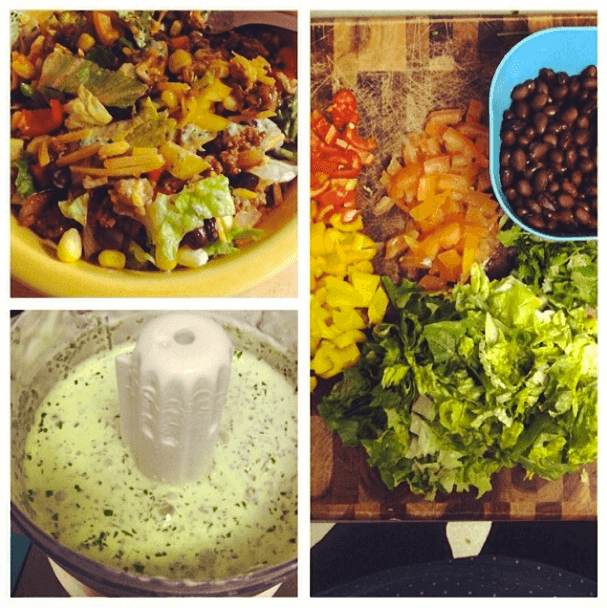
I’ve been eating lots of salads lately (which is a sentence I never thought I would say). But I’ve discovered salads don’t have to be hard to eat if you add the right ingredients! Here’s my favorite combination right now:
chopped lettuce
mini bell peppers, all different colors
corn
black beans
cilantro
tomatoes
cheddar cheese
avocado (If I have enough calories/fat left for the day)
ground turkey cooked with homemade taco seasoning, onions, and garlic (or use grilled chicken)
creamy cilantro dressing
1 cup loosely packed cilantro, stems removed and roughly chopped
1/2 cup plain Greek yogurt or low-fat sour cream
2 Tbsp. fresh lime juice
1-2 garlic cloves
1/4 cup olive oil (I think I used less)
1 1/2 tsp. white wine vinegar (or apple cider vinegar)
1/8 tsp. salt
Yum! Just thinking about it now makes me want to make it again for dinner but T.J. might die if I make it again so soon!
With all the snow storms we’ve had these past couple of weeks, Eva and I have turned to baking/cooking in the kitchen. We just ate our sorrows away with lots of Valentine themed food.
Thank goodness I have this little helper to keep me in line! She LOVES eating dough/making a mess helping in the kitchen.
https://katiederrick.com/wp-content/uploads/2015/12/logo.png00Katiehttps://katiederrick.com/wp-content/uploads/2015/12/logo.pngKatie2014-02-17 17:10:082014-02-17 19:42:36Valentine's Day Baking
We had the missionaries over for dinner tonight and so I wanted to make some treats. Plus, it’s Superbowl. So, lots of excuses to make a dessert. I really wanted to make sugar cookies because they are absolutely delicious but they take so much time when you factor in chilling the dough, rolling them out, cutting, baking, cooling, and frosting. It’s like an all day event when I make sugar cookies. But still. I needed sugar cookies.
Enter the drop sugar cookie idea. I’ve only made them from a cookie mix and for a mix, they were pretty good. So, I looked up a recipe online knowing the problem was solved and hoped for the best.
Well, they were amazing and I’m definitely going to make them again! I was a little sad they weren’t in cute shapes (I have woodland creatures cookie cutters, dinosaurs, along with the classic cutters), but they satisfied my sugar cookie craving and only took about an hour start to finish. Make them next time you have a little party or get together!
1/2 cup butter, softened
1/2 cup crisco
1 cup sugar
1 teaspoon vanilla
1 egg
2 1/2 cups flour
3/4 teaspoon salt
1/2 teaspoon baking soda
2 Tablespoons milk
Preheat oven to 350°F. In the bowl of an electric mixer, cream butter, crisco, and sugar until fluffy. Add vanilla and egg; mix. In a separate bowl, sift together flour, salt, and baking soda. Add dry ingredients to mixer and combine. Add milk and stir until completely incorporated. Roll dough into Tablespoon-sized balls and place on a greased baking sheet. Flatten balls slightly with the palm of your hand or the bottom of a drinking glass dipped in flour. Bake for 10-12 minutes, until cookies are just beginning to turn golden on the edges. Remove from oven and cool completely before frosting. Makes approximately 3 dozen cookies.
https://katiederrick.com/wp-content/uploads/2015/12/logo.png00Katiehttps://katiederrick.com/wp-content/uploads/2015/12/logo.pngKatie2014-02-02 20:03:272014-02-02 20:03:27Drop Sugar Cookies
I’ve made a white bean chili once before and I was very surprised on how delicious it was… I’m a red chili type of girl usually. But I decided I wanted to make it again today, although didn’t feel like going to the grocery store today because it is a frigid 18 degrees. So, I found a different recipe that I had most of the ingredients for and then modified it a bit. I made it immediately for lunch and I can’t get enough. I just used up a lot of my calories and fat for the day… oh well! It was delicious!
White Bean Chicken Chili
ingredients:
1 t onion powder
1 clove garlic, minced
3 T butter
2 tablespoons flour (more or less, or you can use cornstarch)
1 1/2 teaspoon cumin
1 can Navy beans (drained)
1 can cannelini beans (drained)
1-2 cans of Chicken broth (depends how thick you like it)
2 cups chopped, cooked chicken*
toppings (optional):
lots of shredded cheese
sour cream
tortilla chips
*I just used precooked fajita chicken strips I had in the freezer.
Pour can of chicken broth into large pot-cook on stovetop on medium. Add butter, and whisk in onion powder, garlic, and cumin. Once butter is melted, add beans and chicken. Sprinkle in flour (or corn starch/cold water mixture) to thicken, if you’d like. Stir to combine and let simmer until it thickens. Serve with or without toppings.
In college, I had a roommate who made the BEST sugar cookies. She’d leave a plate out for the roommates, and it was so hard not to take all of them. I eventually got the recipe from her and have used it ever since (until this year… but more on that later).
What made them so good is the shortening. I NEVER cook with shortening, but this is one exception that is worth it. They are light, and not too sweet. In fact, the dough doesn’t even have a great taste. But the end result is delicious:
———-
———-
Shortening Sugar Cookies
3/4 C. shortening(part margarine or butter)
1 C. sugar
2 eggs
1 tsp vanilla
2 1/2 C. flour
1 tsp baking powder
1 tsp salt
Mix thoroughly shortening, sugar, eggs, and vanilla. Blend in flour, baking powder and salt. Cover dough; chill at least 1 hr.
Pre-heat to 400 degrees.
Place on ungreased baking sheet. Bake 6-8 mins. Once you think they’re ready, get them out. Don’t give them another minute! Mine are perfect at 7 minutes.
———-
———-
Okay, so for the second recipe, I decided to try out a new recipe that used butter because I didn’t have shortening on hand, nor did I feel like buying it. So, I found one online here that had good reviews. They are your classic sugar cookies. The dough is delicious and they are pretty sweet. They are good, but nothing out of the ordinary. Also, if you make them too thin, they will dry up. So, cut them thin and bake them for the minimum amount of time.
———-
———-
INGREDIENTS:
1 1/2 cups butter, softened
2 cups white sugar
4 eggs
1 teaspoon vanilla extract
5 cups all-purpose flour
2 teaspoons baking powder
1 teaspoon salt
DIRECTIONS:
1.
In a large bowl, cream together butter and sugar until smooth. Beat in eggs and vanilla. Stir in the flour, baking powder, and salt. Cover, and chill dough for at least one hour (or overnight).
2.
Preheat oven to 400 degrees F (200 degrees C). Roll out dough on floured surface 1/4 to 1/2 inch thick. Cut into shapes with any cookie cutter. Place cookies 1 inch apart on ungreased cookie sheets.
3.
Bake 6 to 8 minutes in preheated oven. Cool completely.
———-
———-
In the middle of rolling all of these cookies out, Ashley and I thought it wasn’t going to make enough, so we thought… hey, why don’t we make another batch of a different recipe? We ended up making 80 cookies Thursday afternoon. We are crazy. But it was fun to test out the different recipes.
For the third recipe, we made those sour cream sugar cookies. They are supposed to taste like the ones at the grocery store with the pink frosting, you know? That kind of was a turn off for me because those always make me feel sick. But I realized, it’s the frosting that I don’t like. The cookie part is actually really soft, fluffy, and not overly sweet. I’ll definitely make these again.
This recipe also has the icing recipe that we used! I have only made traditional buttercream frosting, so this was a fun change! Go easy on the almond extract and remember that it will harden up after a while so don’t be discouraged when the icing seems runny.
Sift together flour, baking soda, and salt in bowl and set aside.
Cream butter sugar, egg and vanilla. Beat 2 minutes.
Add sour cream and beat well.
Add dry ingredient mix (flour, baking soda, and salt) and blend well.
Roll on floured board to desired thickness. (1/4 inch thick will create thick cookies that will stay moist for up to two weeks).
Cut into desired shapes with cookie cutters.
Bake on greased cookie sheet at 325°F for 12 minutes.
Allow cookies to cool completely before decorating.
Pour bag of confectioner sugar into bowl.
Whisk the 1 stick butter (melted), 1 tbsp almond extract, and 1/2 can evaporated milk in separate bowl until well mixed.
Slowly blend into the powered sugar a bit at a time until the icing is a good consistency for decorating. Will not take the entire mixture.
Pour icing into smaller bowls and use food coloring to make icing into different colors.
Decorate with icing as desired.
Use remaining butter, almond, evap.milk mixture to freshen up the icing as it hardens over time. Re-heat the mixture in the microwave before adding to the icing. Add to the icing a few drops at a time until the icing becomes spreadable again. You may have to add more food coloring to freshen up the color.
Use sprinkles, candy, and a lot of imagination to decorate cookies.
Lay decorated cookies on wax paper to dry, it will take icing about 2 hours to firm onto cookie but once dry you can store them in an airtight container.
———-
———-
There you have it! Three Sugar Cookie Recipes! Try them all and see which ones you like the best!
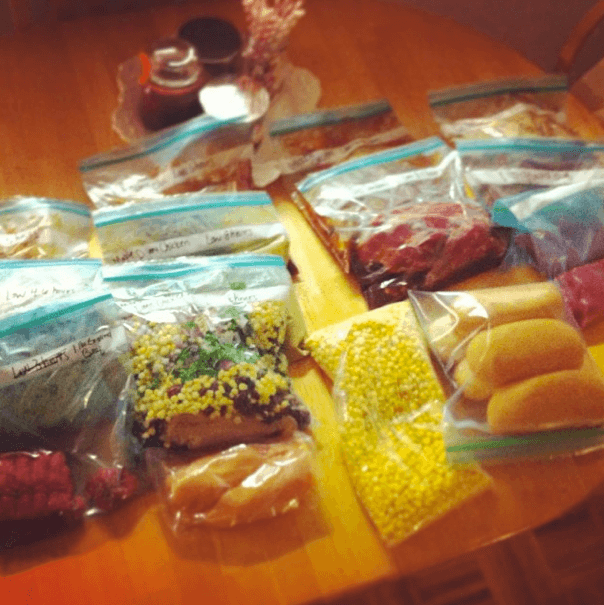
My friend Ashley and I were talking one day and decided it would be worth our time and money to make some freezer meals, especially now that it’s getting cold and we don’t want to have to make as many trips to the grocery store. We started pinteresting, and Ashley found a link to the Six Sisters’ Stuff for 8 freezer meals that you can make at one time. It had the recipes for all the meals and even a shopping list already made to make it extra simple. They were different than most freezer meals I have seen because they were all for the crockpot. I had never made freezer meals before because most of them are casseroles and never sounded especially tasty. But for the most part, these sounded pretty good so we decided to do it!
The post by the Six Sisters said it could be done in one hour. Maybe it’s because we had two kids to tend, we doubled the recipes, and we had a small kitchen space, but it definitely took us longer than an hour. But we turned on Christmas music and it was actually a really fun afternoon! I’ll definitely be doing this again!
To start off, we went to BJ’s (the knockoff Costco that’s in walking distance) and bought everything that was worth buying in bulk. It helped that we were doing it together and splitting the costs because we could buy in bigger quantities and save money in the long run. You guys should have seen us. It was truly a sight to be seen. Ashley was pushing her stroller with little Brooks, Eva didn’t want to sit in her stroller, so I was chasing after her in the store, and pushing my stroller. We bought so much food. I felt like we were cooking for an army. And since we didn’t have the hands to push a cart, we were piling up all of the food in/on/above/below our strollers. It was madness. But hilarious. We then came back to my place, we put the kids down for a nap, Ashley started dividing the meat, and I went back to the regular grocery store to get all of the food we still needed.
From there, after all of the meat was divided, we just went through each freezer meal and assembled them! Sometimes we made mistakes, so let’s hope it won’t affect the meals too much! But in the end, we felt like champions–freezing 8 big meals each (with each meal enough for two days worth for our small families) and having extra meat and veggies for storage!
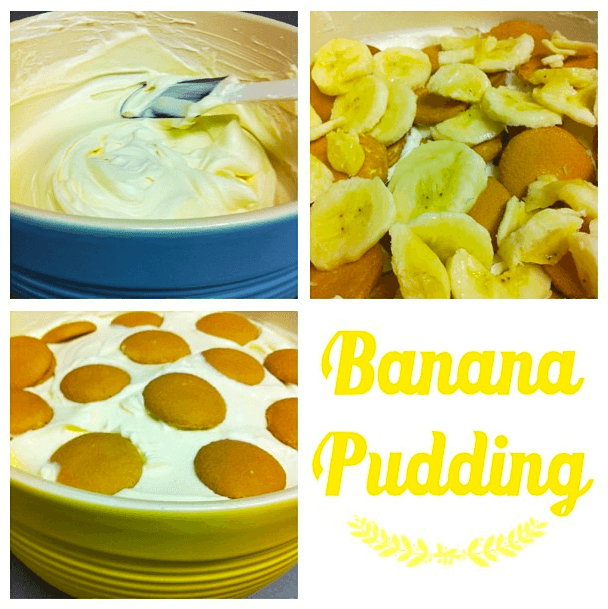
I wasn’t joking when I said Magnolia’s Banana Pudding changed my life. Okay, maybe I was a bit dramatic. But really. It’s so good. I don’t even really like pudding. Especially banana pudding. But man. This is so good. And after making my own, I know why.
It is VERY fattening. But sometimes you have to make fattening desserts because cookies made with applesauce just get old.
So, here’s a copycat recipe I found online. I thought it tasted just as good as the real stuff. And it costs MUCH cheaper to make your own, considering a small at Magnolia’s is about five bucks.
With an electric mixer, combine the can of sweetened condensed milk and the water in a medium sized bowl and mix together very well.
Add the pudding mix to the bowl and continue mixing until well combined.
Refrigerate for 2-4 hours until it is well set.
Once the pudding is set, whip the 3 cups of heavy cream in a new bowl with an electric until stiff peaks appear.
Next, take your bowl pudding and slowly add it to the heavy cream. Then mix everything together very well. It will taste delicious but it’s not ready yet are not ready yet… it’s still vanilla pudding!
Chop up the bananas into thin slices.
Get a large glass bowl (I had to use a ceramic bowl which is fine, you just don’t see the layers) and start layering. First put a layer of Nilla wafers, then bananas, and then pudding. Repeat until pudding is gone.
Garnish the top with vanilla wafers and then stick it in the fridge for about 4-5 hours, or overnight. This part is the hardest because you will want to eat it immediately. But it’s best to wait so the bananas flavor the pudding and the wafers get nice and cake-like.
That’s it! It’s so easy and tastes like a dream! Enjoy!
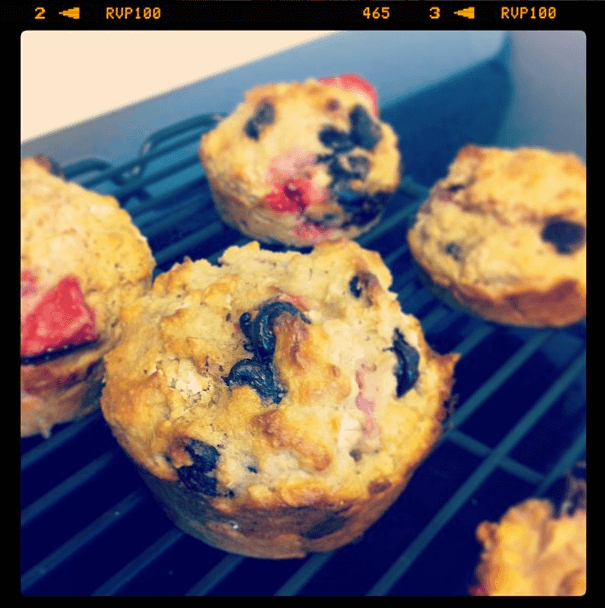
On Friday, Eva and I split a muffin from a bakery and she devoured it and kept asking for more. “Mo mo mo mo!” For Eva, that’s a big deal. So, I decided to make a bunch of healthy muffins to freeze (well, pretty healthy). The first recipe for Rolled Oats, Chocolate and Strawberry Muffins. I found the recipe on Lauralicious Recipes but it was all in mL and grams. I have converted the recipe (and modified it a bit) and they turned out wonderfully. My only concern is how well they’ll freeze with the strawberries, but it’s worth a shot.
Ingredients (Makes 12)
1 1/3 c whole-wheat flour
1 1/4 c rolled oats
2 T baking powder
1/3 c semi-sweet chocolate chips
1 c milk
1/4 c honey
1/8 c olive oil
2 egg whites
Handful strawberries (sliced in quarters)
Pinch of salt
Directions
Preheat the oven to 430°F and spray muffin pan.
Mix all the dry ingredients (including the chocolate) in a bowl.
Add the olive oil, milk, egg whites and strawberries and mix. If the mixture is a bit dry, add a bit more milk.
Fill each muffin cup with 2/3 with the batter and bake in the oven for about 15-17 minutes and then transfer the muffins to a wire rack to cool.
Make sure you check out Lauralicious Recipes to see the original recipe and for more recipe ideas.
The second recipe was taken from a bunch of different recipes I found online. Basically it’s a Rolled Oat, Chocolate, Carrot, Cinnamon, Apple Muffin. Basically. Next time I’m going to take out the chocolate chips. They’re sweet enough without it I think.
Ingredients (Makes 24)
1 1/2 c whole wheat flour
1 1/2 c rolled oats
2/3 c brown sugar
2 tsp baking soda
1 tsp baking powder
1/2 tsp salt
1 T ground cinnamon
2 c carrots shredded
1/2 c chocolate chips
1 c applesauce
3/4 c milk
2 eggs, beaten
1 tsp vanilla extract
Directions
Preheat the oven to 350°F and spray muffin pan.
Mix all the dry ingredients (including the chocolate) in a bowl.
Add the remaining ingredients and mix.
Fill each muffin cup with 2/3 with the batter and bake in the oven for about 15 minutes and then transfer the muffins to a wire rack to cool.
Another salad recipe, I know… I know! But guys, try these recipes that I’m sharing! They are so easy to make and really will fill you up. In the summer, I hate using the oven or crockpot, so this recipe is a great dish and feels so light.
INGREDIENTS
1 1/2 cup cooked couscous (or you could use quinoa or brown rice)
1/3 cup diced red onion
2 Tbsp lime juice
1 15-ounce can black beans, drained and rinsed
1 can corn
1/2 pint of cherry tomatoes, quartered
3 oz feta
1/4 cup chopped cilantro, including tender stems, packed
2 Tbsp olive oil
Salt and pepper
Mix everything together and serve! Sorry, no picture today… just take my word on it.
https://katiederrick.com/wp-content/uploads/2015/12/logo.png00Katiehttps://katiederrick.com/wp-content/uploads/2015/12/logo.pngKatie2013-07-14 13:38:452013-07-11 13:45:35Couscous Salad with Black Beans, Corn, and Tomatoes
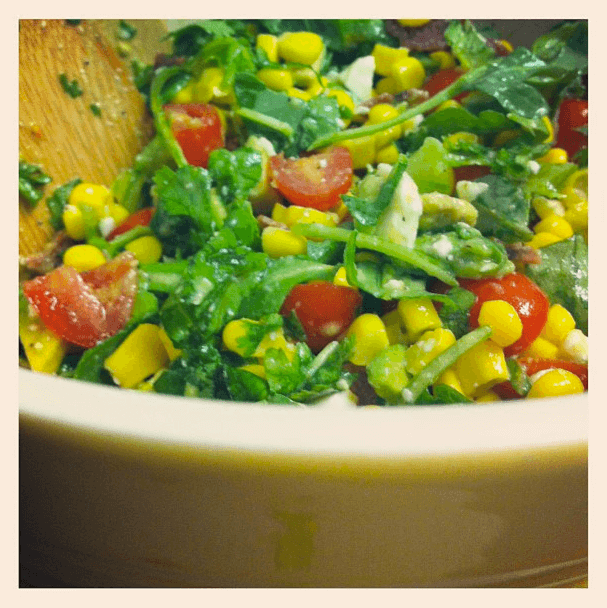
Let me start by saying that I’m not the type of person who would ever want to eat a traditional lettuce salad (unless I’m at Olive Garden). But this recipe caught my eye on Pinterest because something about chopped salads make it seem more appealing. And anything with corn and avocados in it, sign me up. So, I tried out this recipe earlier this week and couldn’t stop eating it! T.J. even had seconds. SECONDS OF A SALAD? What? Crazy. It just shows how delicious it is!
The recipe comes from my new favorite food blog called How Sweet It Is. You guys should add her blog to your list. Thanks for sharing, fellow blogger!
Ingredients:
2 cups butter lettuce, chopped
2 cups fresh arugula, chopped
1 pint grape tomatos, quartered
4 slices thick-cut bacon (I used turkey bacon-T.J. didn’t even notice)
1 cup sweet corn
1 avocado, chopped
4 ounces feta, crumbled
As a note, to chop my lettuce I like to lay it out on a big cutting board and just continuously run my knife through it (in all different directions) until it’s chopped as much as I like.
In a large bowl, combine lettuce, arugula, tomatoes, corn and avocado. Add in salt, pepper, olive oil and lime juice then toss well to coat. Fold in bacon and feta then divide evenly amount 2 plates. Serve!